Working with GPIO
A GPIO (General-Purpose Input/Output) pin is a programmable digital signal pin on a circuit board or a microcontroller that may act as an input or an output. Raspberry Pi has a set of easily accessible GPIO pins, some of which have hardware PWM.
Use the pinout for figuring out, which Raspberry Pi's pins support GPIO and PWM.
The pigpio library for interfacing with the GPIO pins is already preinstalled on the RPi image. To interact with this library, run the appropriate daemon:
sudo systemctl start pigpiod.service
To enable automatic launch of the daemon, run:
sudo systemctl enable pigpiod.service
pigpiodmay interfere with LED strip if configured improperly. Make sure that the strip is connected to GPIO21. On image versions lower than 0.17 change the service start string in/lib/systemd/system/pigpiod.servicetoExecStart=/usr/bin/pigpiod -l -t 0 -x 0x0FFF3FF0.
Example of working with the library:
import time
import pigpio

# initializing connection to pigpiod
pi = pigpio.pi()

# set pin 11 mode for output
pi.set_mode(11, pigpio.OUTPUT)

# set signal of pin 11 to high
pi.write(11, 1)

time.sleep(2)

# set signal on pin 11 to low
pi.write(11, 0)

# ...

# setting pin 12 mode for input
pi.set_mode(12, pigpio.INPUT)

# read the state of pin 12
level = pi.read(12)
To find out the pins' numbers, consult the Raspberry Pi pinout.
Connecting servos
Servo motors are typically controlled with PWM signal. Extreme positions of servos are reached with signal widths approximately equal to 1000 and 2000 µs. Values for a specific servo can be determined experimentally.
Connect the signal wire of the servo to one of GPIO-pins of the Raspberry. To control a servo connected to the pin 13 use a code like this:
import time
import pigpio

pi = pigpio.pi()

# set mode of pin 13 to output
pi.set_mode(13, pigpio.OUTPUT)

# set pin 13 to output PWM signal 1000 us
pi.set_servo_pulsewidth(13, 1000)

time.sleep(2)

# set pin 13 to output PWM signal 2000 us
pi.set_servo_pulsewidth(13, 2000)
Connecting an electromagnet
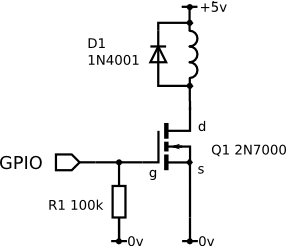
To connect an electromagnet use a field-effect transistor (MOSFET). Connect the MOSFET to one of GPIO-pins of the Raspberry Pi. To control the magnet connected to the pin 15 use a code like this:
import time
import pigpio

pi = pigpio.pi()

# set mode of pin 15 for output
pi.set_mode(15, pigpio.OUTPUT)

# enable the magnet
pi.write(15, 1)

time.sleep(2)

# disable the magnet
pi.write(15, 0)
A more comprehensive description of the Raspberry Pi GPIO pins and additional examples of circuits are available at the Embedded Linux wiki.