Working with a LED strip
Documentation for the image versions, starting with 0.21. For older versions refer to documentation for version 0.20.
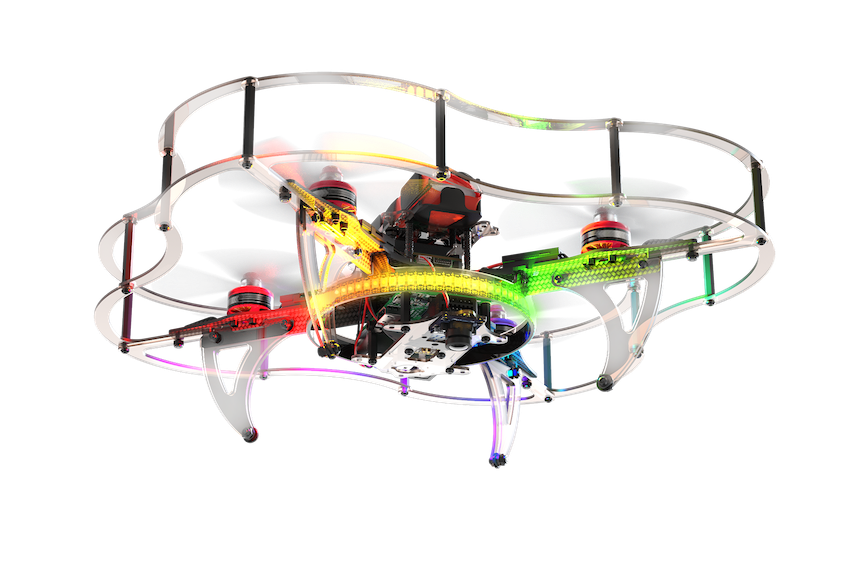
Clover drone kits contain addressable LED strips based on ws281x drivers. Each LED may be set to any one of 16 million possible colors (each color is encoded by a 24-bit number). This allows making the Clover flight more spectacular, as well as show flight modes, display stages of current user program, and notify the pilot of other events.
Our Raspberry Pi image contains preinstalled modules for interfacing with the LED strip. They allow the user to:
- manage LED strip effects and animations (high-level control);
- control individual LED colors (low-level control);
- configure the strip to display flight events.
LED strip can consume a lot of power! Powering it from a Raspberry Pi may overload the computer's power circuitry. Consider using a separate BEC as a power source.
High-level control
- Connect the +5v and GND leads of your LED to a power source and the DIN (data in) lead to GPIO21. Consult the assembly instructions for details.
Enable LED strip support in
~/catkin_ws/src/clover/clover/launch/clover.launch:<arg name="led" default="true"/>Configure the ws281x parameters in
~/catkin_ws/src/clover/clover/launch/led.launch. Change the number of addressable LEDs and the GPIO pin used for control to match your configuration:<arg name="led_count" default="58"/> <!-- Number of LEDs in the strip --> <arg name="gpio_pin" default="21"/> <!-- GPIO data pin -->
High-level interface allows changing current effect (or animation) on the strip. It is exposed as the /led/set_effect service. It has the following arguments:
effectis the name of requested effect.r,g,bare RGB components of effect color. Each component is an integer in a 0 to 255 range.
Currently available effects are:
fill(or an empty string) fills the whole strip with the requested color;blinkturns the strip on and off, setting it to the requested color;blink_fastis the same, but faster;fadefades smoothly to the requested color;wipefills the strip with the requested color one LED at a time;flashblinks twice and returns to the previous effect;rainbowcreates a rainbow-like shifting effect;rainbow_fillcycles the strip through rainbow colors, filling the whole strip with the same color.
Python example:
import rospy
from clover.srv import SetLEDEffect

rospy.init_node('flight')

set_effect = rospy.ServiceProxy('led/set_effect', SetLEDEffect)  # define proxy to ROS-service

set_effect(r=255, g=0, b=0)  # fill strip with red color
rospy.sleep(2)

set_effect(r=0, g=100, b=0)  # fill strip with green color
rospy.sleep(2)

set_effect(effect='fade', r=0, g=0, b=255)  # fade to blue color
rospy.sleep(2)

set_effect(effect='flash', r=255, g=0, b=0)  # flash twice with red color
rospy.sleep(5)

set_effect(effect='blink', r=255, g=255, b=255)  # blink with white color
rospy.sleep(5)

set_effect(effect='rainbow')  # show rainbow
You can also set colors from your Bash shell:
rosservice call /led/set_effect "{effect: 'fade', r: 0, g: 0, b: 255}"
rosservice call /led/set_effect "{effect: 'rainbow'}"
Configuring event visualizations
It is possible to display current flight controller status and notify the user about some events with the LED strip. This is configured in the ~/catkin_ws/src/clover/clover/launch/led.launch file in the events effects table section. Here is a sample configuration:
startup: { r: 255, g: 255, b: 255 }
connected: { effect: rainbow }
disconnected: { effect: blink, r: 255, g: 50, b: 50 }
<!-- ... -->
The left part is one of the possible events that the strip reacts to. The right part contains the effect description that you want to execute for this event.
Here is the list of supported events:
| Event | Description | Default effect |
|---|---|---|
startup | Clover system startup | White |
connected | Successful connection to flight controller | Rainbow |
disconnected | Connection to flight controller lost | Red blink |
armed | Transition to Armed state | |
disarmed | Transition to Disarmed state | |
acro | Acro mode | Orange |
stabilized | Stabilized mode | Green |
altctl | Altitude mode | Yellow |
posctl | Position mode | Blue |
offboard | Offboard mode | Violet |
rattitude, mission, rtl, land | Corresponding mode | |
error | Error in one of ROS nodes or in the flight controller (ERROR message in /rosout) | Red flash |
low_battery | Low battery (threshold is set in the threshold parameter) |
You need to calibrate the power sensor for the
low_batteryevent to work properly.
In order to disable LED strip notifications set led_notify argument in ~/catkin_ws/src/clover/clover/launch/led.launch to false:
<arg name="led_notify" default="false"/>
Low-level control
You can use the /led/set_leds ROS service to control individual LEDs. It accepts an array of LED indices and desired colors.
Python example:
import rospy
from led_msgs.srv import SetLEDs
from led_msgs.msg import LEDStateArray, LEDState

rospy.init_node('flight')

set_leds = rospy.ServiceProxy('led/set_leds', SetLEDs)  # define proxy to ROS service

# switch LEDs number 0, 1 and 2 to red, green and blue color:
set_leds([LEDState(0, 255, 0, 0), LEDState(1, 0, 255, 0), LEDState(2, 0, 0, 255)])
You can also use this service from the your Bash shell:
rosservice call /led/set_leds "leds:
- index: 0
  r: 50
  g: 100
  b: 200"
Current LED strip state is published in the /led/state ROS topic. You can view the contents of this topic from your Bash shell:
rostopic echo /led/state
Using the same topic you can get the configured number os LEDs, using Python:
led_count = len(rospy.wait_for_message('led/state', LEDStateArray, timeout=10).leds)